at what angle is the offset arm to the body of the piece?
7. TOPOGRAPHICAL SURVEYS - PLAN SURVEYING
7.0 Introduction | ||
What is a topographical survey? | ||
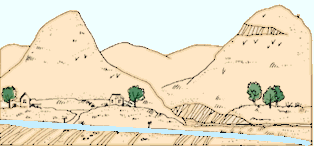
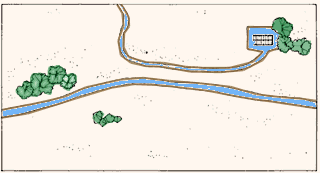
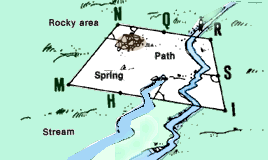
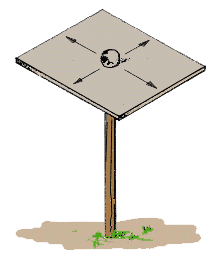
| i. A survey of your fish culture site can assist you lot practice i of two things: make a map to help you plan your work; or lay out marks on the basis that will guide you as you work. | Site | |
2. Topographical surveys will help you to make plans or maps of an expanse that evidence:
| Map | |
| Vertical contour | ||
What practise topographical surveys involve? | ||
| 3. The purpose of the first type of topographical survey is to found, on a horizontal plane, the position of one or more points in relation to the position of one or more than other points. To do this, you will measure horizontal distances and horizontal angles or directions. You volition use a method chosen programme surveying, which will be explained in this chapter. | Site | |
| 4. The purpose of the second type of topographical survey is to detect the top (or vertical meridian) of 1 or more points to a higher place a definite horizontal plane. To exercise this, you will measure horizontal distances and pinnacle differences; you may likewise demand to lay out contour lines. You lot will employ a method called direct levelling, which volition be explained in Chapter viii. | Map | |
| v. You will acquire how to make plans and maps based on the results of program surveying and straight levelling in Chapter 9. | Contour map | |
Planning your topographical surveys | ||
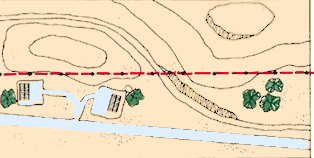
| half dozen. When yous plan a topographical study, the most important rule to remember is that you must work from the whole to the function, keeping in heed all of the work you lot will need to do as yous begin the first steps. Different types of survey require different levels of accuracy, but you should lay down the first points of each survey every bit accurately as possible. You lot volition arrange all the work you lot do afterward to agree with these first points. | Primary points | |
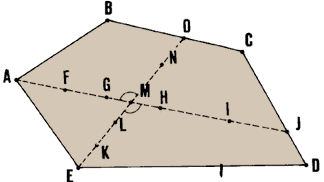
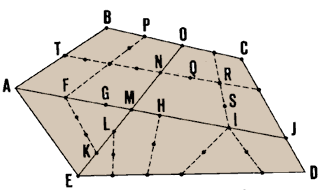
| Example You need to programme survey a fish-subcontract site. (a) Get-go, you must make a perimeter survey ABCDEA. Besides these summits and boundaries, add together several major points and lines, such as AJ and EO. They run beyond the interior to create right angles, which volition assist you in your calculations. This survey gives the primary survey points, which you should determine and plot very accurately. (b) Then, lay out minor lines such as FP and TN. They go between the major lines to divide the area intoblocks. This gives you the secondary survey points, which yous may determine less accurately. (c) Finally, survey details in each block using tertiary points, for which less accuracy is as well acceptable. | Secondary points | |
| | ||
| 7. The way yous plan a topographical survey will too depend on its purpose. You will apply a planning method like to the one described for soil surveys (encounter Book six, Soil, Department 2.4).
| |

8. The way yous plan a topographical survey will depend on the discipline you lot need to survey, such as:
| Centre-line of a dike | |
| Adjacent pond dikes | ||
| Pond surface area | ||
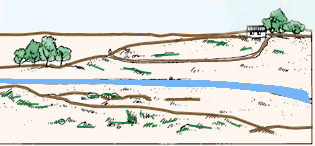
| 9. In open up land, you will have no issues in plan surveying with the methods explained in the next sections. Any of the post-obit methods should work well. In country with thick forests, withal, you volition not be able to use methods for which you need to see several points at the same time. In such areas, y'all volition also need to rely on existing paths and roads much more than than usual, and you might fifty-fifty demand to articulate lines of sight through the vegetation. | Clearing land for a survey |
What are the master methods used in program surveying? | ||
| x. In that location are four primary methods used in program surveying. You tin gear up the position of a point on the horizontal plane:
| Open traverse | |
| Each of these methods will be explained in the adjacent sections. When you are choosing a method, you will also demand to consider which methods are suited to the measuring devices you lot have bachelor. Table ix will help you select the most suitable program surveying method, considering your equipment and abilities, the kind of information you need from your survey and the type of terrain you are surveying. | Radiation survey | |
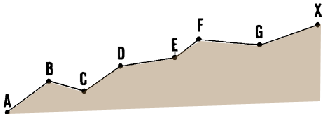
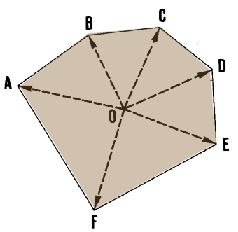
TABLE ix
Plan surveying methods
| Section | Method | Basic elements | Suitability | Remarks |
| vii.1 | Traversing, open up, closed | Traverse sections and stations | Apartment or wooded terrain | Traverse sections may be of equal lengths, longer than 25 chiliad and are best at 40 to 100 grand |
| 7.2 | Radiating, central and lateral stations | Observation station | Small land areas | All points should be visible and at angles greater than 15� |
| 7.3 | Offset | Chaining line | Details surveys next to a chaining line | Chaining line should not exist more than 35 thousand away |
| vii.4 | Triangulation | Base line | Very large land areas | Often combined with traversing and needing elaborate preliminary reconnaissance |
| seven.5 | Airplane-tabling, traversing, radiating, triangulation | Reconnaissance and details surveys | Mapping is done in the field Rapid method after practice |
7.1 How to survey by traversing | ||
What is a traverse? | ||
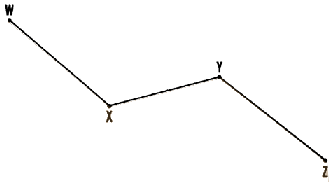
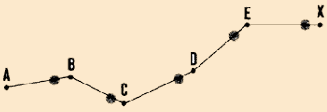
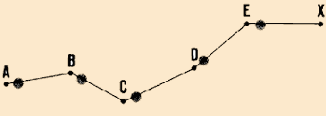
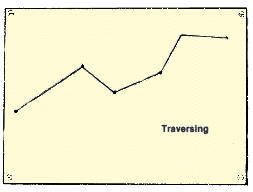
| 1. A traverse line or traverse is a serial of straight lines connecting traverse stations, which are established points forth the route of a survey. A traverse follows a zigzag course, which means information technology changes direction at each traverse station. 2. Traversing is a very mutual surveying method in which traverses are run for plan surveying. It is especially suitable to use in flat or wooded terrain. | Closed traverse | |
| 3. At that place are two kinds of traverses:
| Open up traverse | |
Which method should be used for traversing? | ||
4. When y'all survey by traversing, you demand to brand measurements to detect information on:
| | |
| five. If you lot accept a theodolite (also chosen a transit), you can make a transit traverse. Yous will measure horizontal distances using the stadia method (see Section two.8), and you will measure horizontal angles using the method described in Section iii.5 for use with the theodolite. Similarly, but with much less accuracy, yous could utilise a clisimeter (encounter Section 2.vii) and a graphometer (see Section three.i). | | |
| | ||


Choosing the route of a traverse | ||
| 10. When selecting the route a traverse will follow, you should try to:
| | |
| | ||
Surveying an open traverse with a magnetic compass | ||
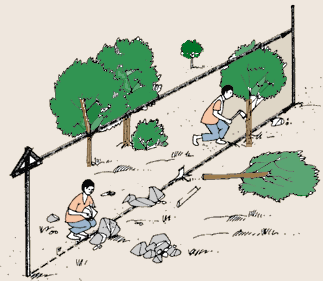
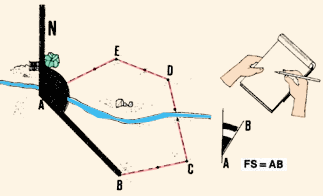
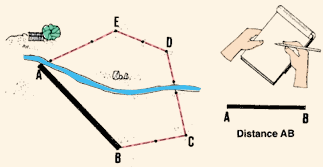
| 11. Yous demand to survey traverse AF for a future h2o supply culvert. First, walk forth the traverse. Marking its course by placing high stakes nigh every fifty chiliad. If necessary, place additional stakes at important traverse stations, such every bit where the traverse changes direction, where hills or other changes in pinnacle reduce visibility between traverse stations, or where there are item mural features such as a route, a river, or rocks. | Mark the main points | |
| 12. If necessary, clear any tall vegetation from the path of the traverse, so that you lot will be able to see each marked point from the one earlier information technology. | Clear the path and mark details | |
| 13. Beginning traversing at the starting time bespeak A. Remove the ranging pole and stand at point A. With the magnetic compass, mensurate the azimuth* of the line joining signal A to point B, the side by side visible indicate. Point A becomes station 1. The management y'all measure from there to point B, or station 2, is called a foresight* (FS) considering you are measuring forward. Note downwardly this value in a table (see pace 17). | FS=AB | |
| fourteen. Replace the ranging pole at station 1 (indicate A) and move to station 2, while measuring the horizontal distance AB past pacing or chaining. Note this altitude down in the table (see footstep 17). | Distance AB |

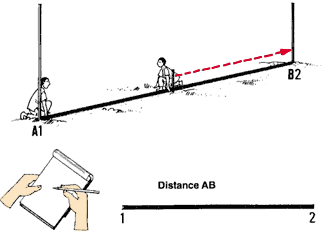
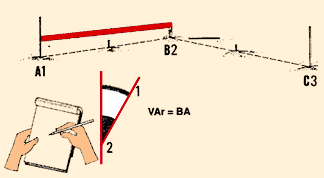
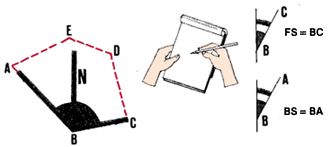
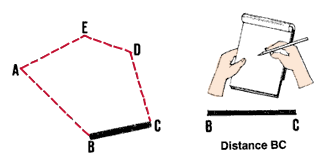
| 15. At station 2 (point B), remove the ranging pole and stand over the bespeak holding the compass. Expect dorsum at station 1 and measure the azimuth of line BA, which is called a backsight (BS). Then expect forward at the next point C, or station three, and mensurate the azimuth of line BC, a foresight (FS). Measure distance BC while moving forrad along the traverse. Note these values down in the table (see step 17). | BS = BA | |
| Note: the difference between the foresight and backsight should be 180�. A departure of just 1 or 2 degrees between the FS and BS is acceptable and may be corrected later (come across step 19). If the error is greater, you should brand the measurement again before moving on to the side by side station. | FS = BC | |
| 16. Repeat this procedure, measuring horizontal distances from station to station and measuring two azimuths (a BS and a FS) for each point. Yet, from the last station at the end of an open traverse, y'all will only have a BS measurement, just every bit you had only an FS from station 1. Note: if the land slopes and you need to employ a more accurate method, you can apply a special method to measure or summate horizontal distances (see Sections 2.half dozen and four.0). | Altitude BC |

17. You should carefully note downwards all the measurements you lot have made in a field book. You lot can use a tabular array like the one shown in the instance or you lot can make a rough sketch of the open traverse on square-ruled millimetric paper, noting downwards your measurements side by side to the correct stations in it.
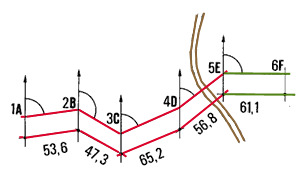
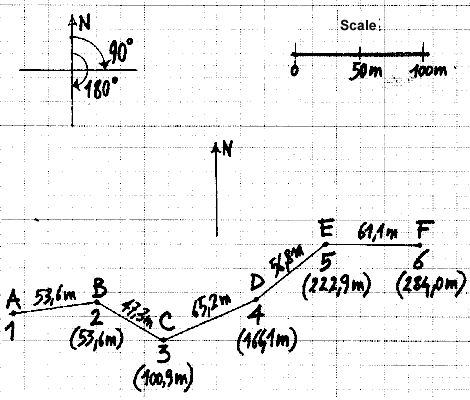
Example
Measurements observed for the first of compass traverse AX made of 12 stations:
| Stations | Distance (m) | Azimuths (degrees) | Calculated difference FS/BS (degrees) | |||
| From | To | Individual | Cumulative | FS | BS | |
| 1 | 2 | 53.half dozen | 53.six | 82 | 261 | 179 |
| 2 | three | 47.3 | 100.ix | 120 | 301 | 181 |
| 3 | 4 | 65.ii | 166.1 | 66 | 248 | 182 |
| 4 | five | 56.8 | 222.nine | 51 | 229 | 178 |
| 5 | vi | 61.ane | 284.0 | 91 | 270 | 179 |
| ... | ... | ... | ... | ... | ... | ... |
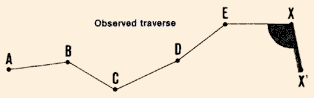
| eighteen. Y'all must e'er check on such a compass traverse, specially if you lot practice not know the exact position of its starting and catastrophe stations beforehand from studying previous surveys or existing maps. To bank check on your compass traverse, do the post-obit: | Observed traverse AX | |
| Observed traverse XA | |
| Observed traverse AX |
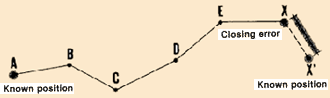
Adjusting an open traverse | ||
| 19. To adjust the observed traverse AX for the endmost error 20', it is easiest to use the graphic method, equally follows: | | |
| ||
| | |
| | |
| Find the intermediate points BCD and Due east | |
| Draw perpendiculars BB', CC', DD' and EE' | |
| Measure out the perpendiculars | |

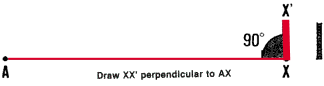
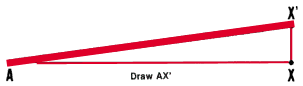
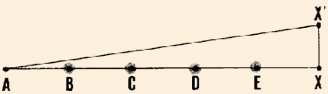
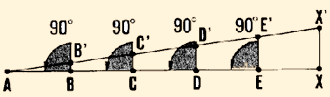
| Draw Xx' | |
| Draw the other segments parallel to Xx' | |
| Mensurate the distance BB', CC', DD' and EE' | |
| Join the points of the adjusted traverse |

Surveying a closed traverse with a magnetic compass | ||
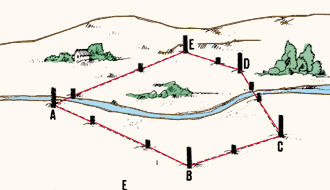
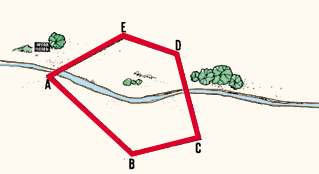
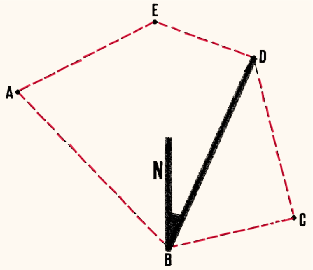
| 20. Y'all can lay out a closed traverse ABCDEA in exactly the same way as an open traverse, except that you will connect the last betoken to the initial signal A. 21. To survey an irregular enclosed expanse of land ABCDEA (such as a site for a fish-farm) by compass traversing, continue equally follows: | | |
| | |
| | |
| | |

| | |
| | |
| | |
| | |
| Note: during the traverse, you may exist able to see 1 or more boosted stations from the station where you are continuing. If you do, measure the azimuths of the lines running toward them. An example is line BD from station B. These boosted observations are useful checks on your work. | | |
| |

22. In a field book, carefully annotation down all your measurements. You can use a table similar to the i suggested for the open traverse (encounter step 17). Yous should also make a sketch of the traverse, on a split up square-ruled page, and write in the measurements. At the same time, check to come across that the foresights and backsights differ by 180�.
Example
Y'all have surveyed site ABCDEA with a closed traverse and your field notes are equally follows:
| Stations | Distance (thousand) | Azimuths (degrees) | Calculated deviation FS/BS (degrees) | ||
| From | To | FS | BS | ||
| 1 | 2 | 90.eight | 136 | 315 | 179 |
| two | 3 | 53.5 | 78 | 259 | 179 |
| 3 | 4 | 68.7 | 347 | 168 | 179 |
| 4 | 5 | 44.6 | 292 | 110 | 182 |
| 5 | 1 | 63.seven | 241 | 63 | 178 |
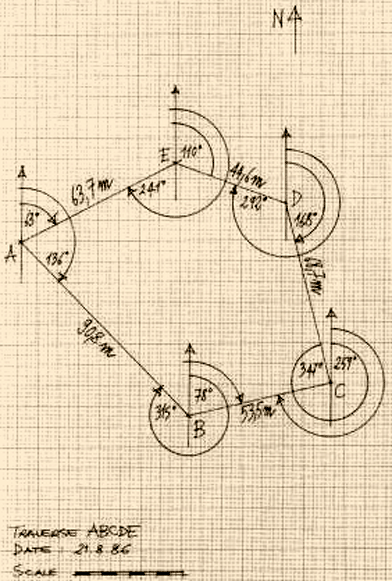
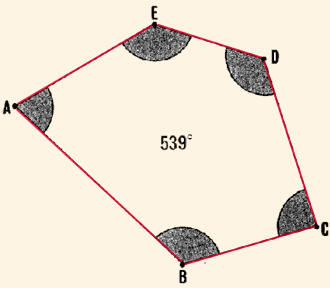
23. You have learned that in any closed polygon* of N sides, the sum of all the interior angles should be equal to (Due north - 2) x 180� (see Section three.0). This dominion will assist you to check your azimuth measurements subsequently yous calculate the interior angle for each station (meet Department 3.2, steps 10 and xi).
Example
Using the observations given in the previous example, calculate the sum of the interior angles of polygon ABCDEA every bit follows:
| Station | Azimuth differences (degrees) | Interior angle (degrees) |
| 1 | AB -AE = 136- 63 | 73 |
| 2 | (BA - BC = 315 - 78 = 237) | 123i |
| 3 | CD - CB = 347 - 259 | 88 |
| 4 | DE - DC = 292 - 168 | 124 |
| 5 | EA - ED = 241 - 110 | 131 |
| Sum of interior angles | 539 |
1 Since the magnetic due north falls inside the angle, you lot must calculate it as 360� - (the azimuth deviation) or 360� - 237� = 123�,
| According to the full general rule, the sum of the 5 interior angles should exist equal to (five-ii) 10 180� = 3 x 180� = 540�, which closely agrees with the above event. | Check: Sum of angles = (five - ii) x 180� = 540� | |
Adjusting a closed traverse | ||
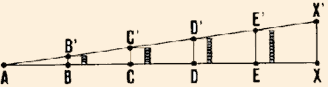
| 24. Starting from station 1 (A), draw the observations of your compass traverse on square-ruled newspaper. Use a protractor to measure the azimuths (see Section 3.iii), and an acceptable calibration for the measured distances (see Section 9.one). If there is a closing mistake, adjust your drawing by using the graphic method described for an open traverse (see footstep 19, above). | | |
| Example For the to a higher place example, the endmost error is FA. Adapt information technology as foIlows: | ||
| Draw AF to calibration | |
| Describe FA' perpendicular to AF | |
| Depict AA' | |
| Find points BCD and E | |
| Draw and measure the perpendiculars | |


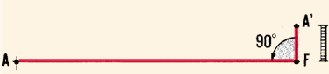
| ||
| Describe FA | |
| Describe the other segments parallel to FA | |
| Measure the appropriate lengths | |
| Join the points of the adjusted traverse |


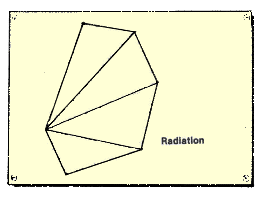
7.two How to survey by radiating | ||
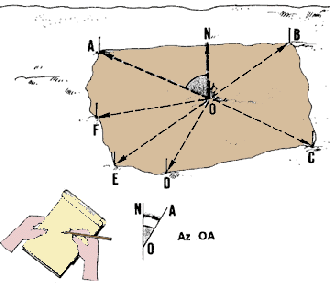
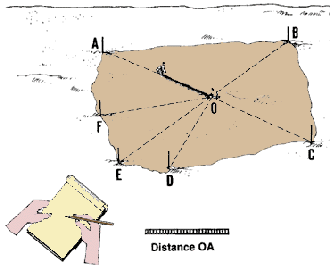
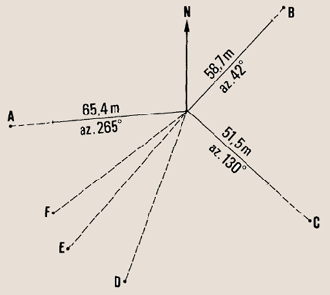
What is a radiating survey? | ||
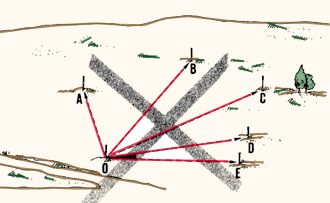
| 1. When yous plan a survey by radiation, you will cull one convenient ascertainment station, from which you volition exist able to see all the points you lot need to locate. This method is excellent for surveying small-scale areas, where you lot need to locate only points for mapping. | two. When yous make a radiating survey of a polygonal* site, you connect the observation station to all the summits of this area past a radiating series of sighting lines. In this way, a number of triangles are formed. You lot volition measure i horizontal angle and the length of two sides for each triangle. | |
Choosing the observation station
three. You should exist able to accomplish the observation station hands. This station should also exist a located so that:
- you lot can see all the summits of the area you demand to survey;
- you can measure the lines joining it to these summits;
- you lot tin can measure the angles formed past these lines.
four. When choosing the ascertainment station, yous should be especially careful to avoid any points from which very small radiating angles (less than 15 degrees) might result.
| | | |
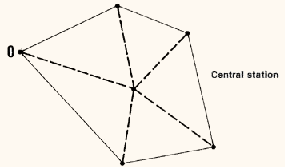
| v. The observation station 0 can be in a fundamental position, within the polygon to be surveyed. In this instance, you will measure as many triangles as in that location are sides of the polygon. | Number of triangles = number of polygon sides | |
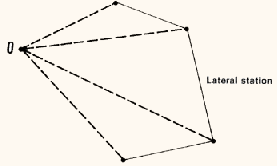
| vi. The observation station 0 can besides exist in a lateral position (off to the side). In this case, 0 will exist ane of the summits of the polygon*. The number of triangles you need to measure will be the number of sides to the polygon, minus 2. | Number of triangles = number of sides minus 2 |
Choosing a method for radiating surveys | ||
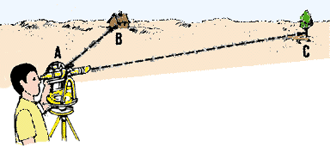
| 7. If you accept a transit (a theodolite), you tin can measure horizontal angles more precisely than with the other instruments (see Department 3.v). A transit equipped with stadia hairs can too be used to measure distances apace (encounter Department 2.8). | | |
| 8. If you have a magnetic compass, y'all can use it to measure the azimuths of the horizontal angles at the observation station (see Department iii.2). Y'all will usually measure horizontal distances by chaining (meet Section 2.6). To learn further details of this elementary method, see steps 10-14, below. | | |
| 9. If y'all have a plane-table, you can use information technology for mapping the area directly from the observation signal (encounter Section nine.2). You lot will then ordinarily measure the horizontal distances by chaining. | | |
Carrying out a radiating plan survey with a magnetic compass | |||||||||||||||||||||||||||||||||||||||||||||||||
| 10. Walk over the area you lot need to survey and choose a user-friendly key observation station 0. Clearly marker all summits of the polygon. Clear whatsoever high vegetation forth the future radiating lines of sight. | | ||||||||||||||||||||||||||||||||||||||||||||||||
| 11. With your magnetic compass, accept a position over the central station 0. Mensurate the azimuths of the six radiating lines OA, OB, OC, OD, OE and OF. 12. Measure out the horizontal distance over each of these lines. | | ||||||||||||||||||||||||||||||||||||||||||||||||
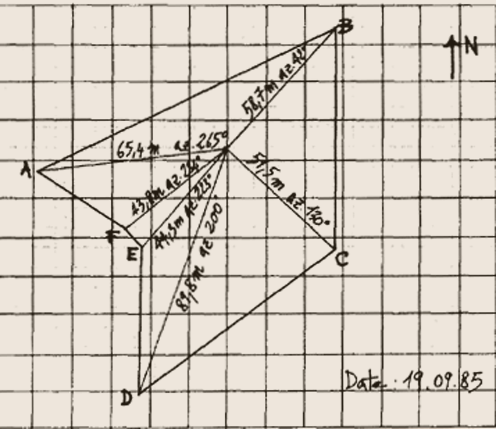
| 13. Carefully note down all these measurements in your field-book. You can utilize the get-go 3 columns of the tabular array given in the example. So make a sketch of the area, with the lines and angles and their measurements, on square-ruled paper. 14. Calculate the value of the angles between successive points (see 4th column of the table and Section 3.2). Check this by adding all the values: if you lot notice 360� or a figure shut to that, the calculation is correct. Example Table for field observations from a radiating survey.
1Since magnetic north falls inside angle AOB, information technology is calculated as 360� minus the difference of the azimuths. | | ||||||||||||||||||||||||||||||||||||||||||||||||
| | |||||||||||||||||||||||||||||||||||||||||||||||||
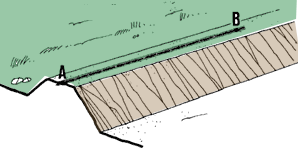
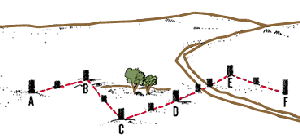
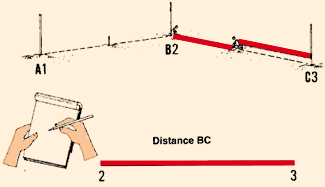
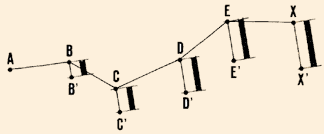
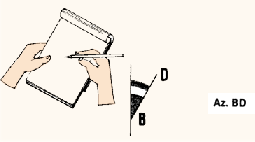
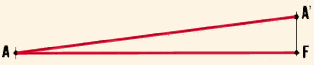
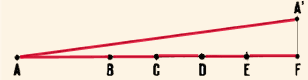
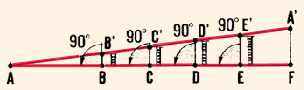
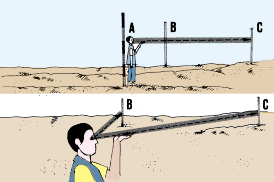
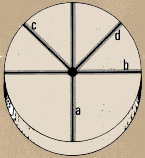
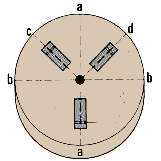
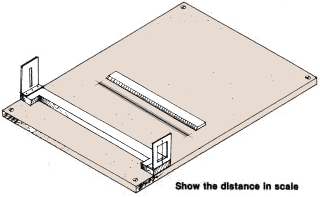
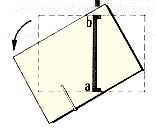
7.three How to survey by offset | ||
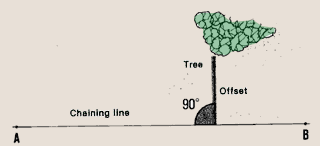
What is an starting time? | ||
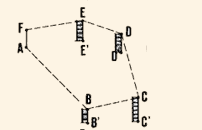
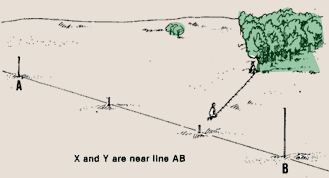
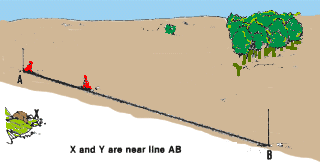
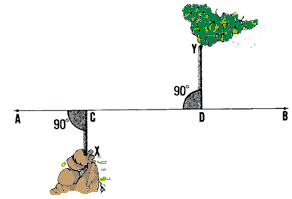
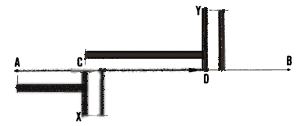
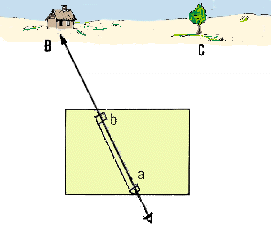
| 1. In programme surveying, an offset is a straight line which is laid out perpendicularly to a line you are chaining. | ii. Offsets are mainly used to survey details of the terrain (such as wells, rocks or trees) which are located close to a chaining line. By and large, offsets are less than 35 chiliad long. | |
| | | |
Surveying by kickoff | ||
| 3. While chaining line AB, you see two points of involvement on either side of it, X and Y, whose exact positions you lot want to record. | | |
| 4. From these points, driblet XC and YD perpendicular to line AB (see Section 3.vi). Lines XC and YD are offsets. | Drop perpendiculars from the points of interest | |
| five. Measure horizontal distances AC and CD on line AB. Measure horizontal distances CX and DY forth the offsets. vi. From these measurements you can plot the exact positions of points X and Y on paper, if line AB is known. | Measure the distance to plot the points | |
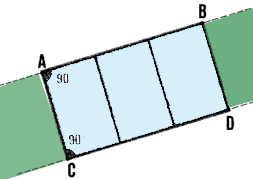
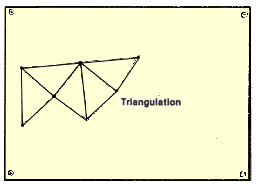
7.4 How to survey by triangulation | ||
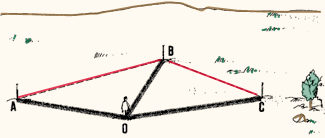
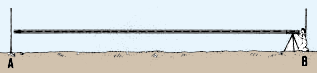
What is triangulation? | ||
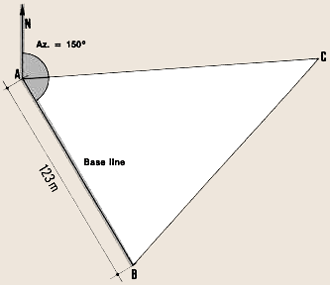
| i. If y'all use the triangulation method, you will grade consecutive triangles, starting from two known points which you tin can see from each other. The directly line joining these two points is chosen the base of operations line. Case A and B are 2 points whose positions yous know. Therefore, you can easily survey the baseline AB to discover the measurements of the horizontal altitude and magnetic azimuth. AB is 123 m long and azimuth AB = 150�. | | |
| 2. To determine the position of a new point C by triangulation, this new signal is joined to the known base line past two new lines, forming a triangle. You can and then observe the position of the new signal:
| Measure distances Ac and BC or... | |
| Instance It you need to determine the position of C, lay out lines AC and BC from base line AB. Then you can:
| ... measure the azimuths of lines Air conditioning and BC | |
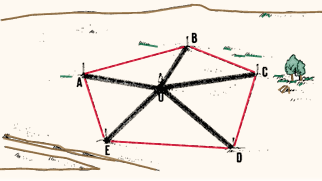
| iii. To find the positions of other new points, use the same procedure. Equally you find the positions of new points, use the most user-friendly existing line equally the new base line and class new triangles as yous work. | Use BC as the base line for new triangle BCD | |
| Example If you lot demand to determine the position of D, layout triangle BCD and use BC as the base line. Similarly, to determine points E, F and 1000, employ base of operations lines CD, DE and EF successively. | Go on making triangles until you take surveyed the whole site | |
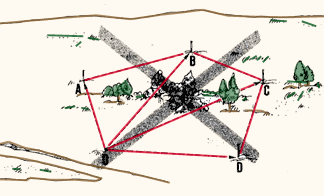
Using the triangulation method | ||
| 4. On terrain with many obstacles such every bit hills, marshes or loftier vegetation, where traversing would exist difficult (see Department vii.i), you can utilize the triangulation method successfully. v. When you are traversing, and cannot measure out a line straight, you can use the triangulation method instead. 6. Triangulation makes locating points on opposite sides of a stream or a lake very easy. | A good site for a triangulation survey | |
Using the triangulation method in the field | ||
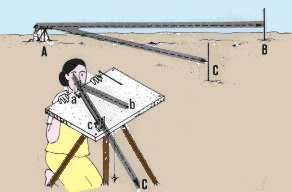
| 7. The simplest mode to utilise the triangulation method in the field is with a plane-tabular array(see Section 7.5). You will learn how to survey past triangulation, using a aeroplane-table, in Section 9.2. 8. When using the triangulation method, avoid very big angles (over 165�) and very small angles (under 15�). The method works best with angles of about 60�. | A plane-table is useful in triangulation | |

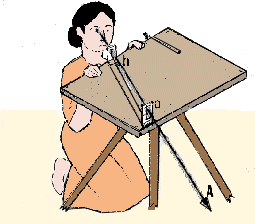
7.5 How to employ the aeroplane-table | ||
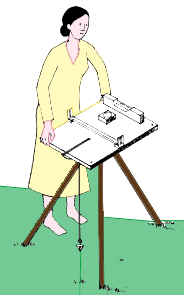
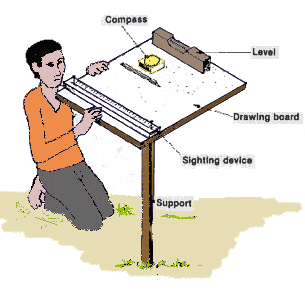
What is a plane-table? | ||
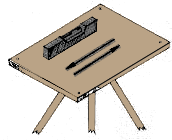
| i. A plane-table is a horizontal drawing-board mounted on top of a vertical support. You use it with a sighting device, a spirit level and a magnetic compass. | Simple plane-table | |
Making a very simple aeroplane-table | ||
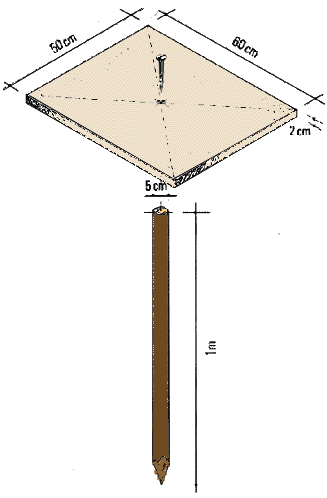
| two. You tin make a very elementary plane-tabular array for reconnaissance surveys from a wooden board and a strong pole. | ||
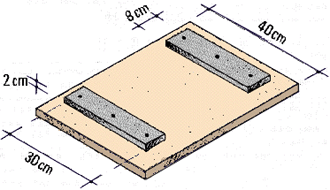
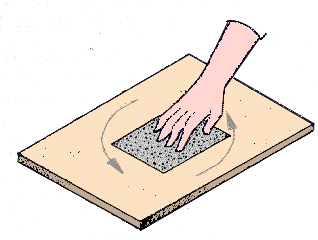
| 3. Get a 50 x 60 cm board of soft wood, most 2 cm thick. With sandpaper, smooth one of its surfaces well until it is very polish. Draw two diagonal lines lightly across this surface to find the centre of the lath. | | |
| 4. Get a straight wooden pole most v cm in diameter and i yard long. Shape one stop into a signal. This will be firmly driven into the basis at the ascertainment point when you use the airplane-table. | ||
| v. Preferably using a brass spiral, fix the board, smooth side up, by its centre-indicate to the peak of the pole. | ||
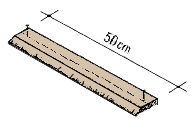
| 6. You tin can make a unproblematic sighting device from an ordinary ruler about l cm long by driving two thin nails vertically into it along the eye-line for sighting. | Make a sighting device | |
| 7. Yous will also demand a simple magnetic compass to use with the plane-tabular array. If you lot have a spirit level, apply it to prepare the top board horizontally. Or merely lay a rounded object such equally a small brawl, a glass marble or a pencil on the board's meridian surface. When the object remains all the same, the board is horizontal. | Make certain the board is horizontal | |
Making an improved airplane-tabular array | ||
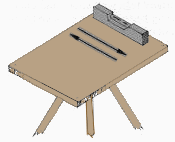
| 8. To survey more precisely, you lot will need a more complicated airplane-table than the i just described. This airplane-table volition be mounted on a tripod (a 3-legged support) and then that:
9. You can build a tripod with legs fabricated out of single pieces of wood, or with adjustable legs. A tripod with adjustable legs is more difficult to make, but it is better since you lot tin set up the plane-tabular array more than hands on sloping ground by changing the length of the legs. | An improved plane-table | |
10. A plane-tabular array with a normal tripod is adequate for surveying horizontal areas and areas with small gradient gradients, which you must often survey in aquaculture. To make this type of plane-table, you lot will demand the post-obit materialsane:
1Adjusted from Using Water Resource, Maryland, Us, VITA Publications, 1977, pp. 137-140. | | |
| 11. Get a slice of forty x 55 cm plywood 2 cm thick to use for the drawing board. If the plywood you have is thinner than 2 cm, make two battens (wooden supports) from two pieces of forest 30 x 8 cm and 2 cm thick. Attach these battens parallel to the 40 cm sides of your board, a few centimetres in from each side. The wood you utilize for the lath should be soft enough to allow drawing pins and ordinary pins to go in easily. Y'all should smooth the top of the board with sandpaper if the surface is irregular. | If the board is sparse, strengthen it with battens | |
| Sand the surface shine | ||


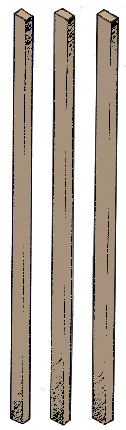
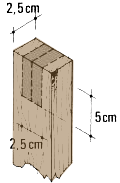
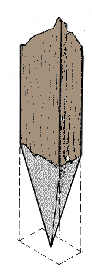
12. Brand the 3 legs from the 1.four yard pieces of wood. Shape each into a signal at one stop. On the other cease- face up of each leg, mark a eye-line parallel to the two.five cm sides. Go on this line 5 cm down either side of the leg. At these two points, mark a centred perpendicular line 2.five cm long; connect the end-points of this ii.v cm line upwards the sides of the leg and over the top. Cutting out this block y'all have marked, which will measure two.5 x 2.five x 5 cm, and discard it. Circular off the edges of the two remaining "prongs" of wood which face toward the ii.five cm side of the leg, using a knife and sandpaper, for example.
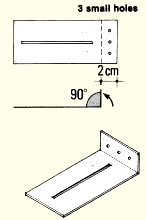
13. On these prongs, drill a 6 mm pigsty at a point 1.3 cm from the pinnacle of the leg.
| | Cut out the blocks | Shape the ends into points | ||
| Round the tops and drill two holes |

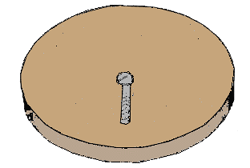
| 14. Brand the rotating connection between the cartoon board and the legs with the two circular pieces and the 3 small blocks of wood. Drill a 6 mm pigsty in the middle of one of the 15 cm wooden circles. Put a 6 mm commodities through the pigsty making sure the caput of the bolt is even with the superlative surface of the circle. | Put the bolt through the centre of the disc | |
| 15. Find the centre of the lower surface of the cartoon board by cartoon ii diagonals across information technology from opposite corners. Concord the wooden circle on this side of the lath, with the caput of the bolt touching the center mark. Nail or spiral the wooden circle in identify. | Nail the disc to the lath and so that the bolt sticks up | |
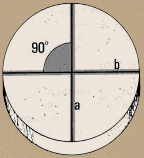
| 16. Take the second 15 cm circle and mark the points where yous will attach the legs. To practice this, get-go draw two perpendicular lines across the circle. They should intersect at the exact centre of the circle. Call them diameters a and b. With a protractor, using line b as the 0 to 180� line, describe two more lines from the centre of the circle to the edge at 45� and 135�. Call them radiuses c and d. They should divide ane one-half of the circle into four equal, wedge-shaped sections. Then drill a 6 mm hole in the center of the circumvolve. | | |
| | ||
| |


17. Drill a half dozen mm pigsty on the centre line of the 4.five x 7 cm face of each 7 cm wooden block, ane.iii cm in from ane end. Boom or screw these three seven cm wooden blocks to the surface of the second wooden circle, so that they join around the centre-hole in a Y-shape. To practise this, align the middle-lines of the blocks' two.v x seven cm faces over the lines a, c and d that you drew in step sixteen. The ends with the holes should be towards the edge of the circle.
| Drill a pigsty in each block | Attach the blocks to the disc, following | |
| eighteen. Place this wooden circle, with the blocks facing you, confronting the circle already stock-still to the underside of the board. Laissez passer the commodities in the first circle through the centre-hole of the 2d circle. Add a washer and a fly nut to it and tighten them securely. | Mountain the disc on the lath | |
| 19. Align the holes in the three legs with the holes in the iii blocks of forest on the underside of the board, and attach the legs with bolts, washers and wing nuts to the blocks. Your airplane-table is now set to use. 20. You lot will also need a pocket-size spirit level, a magnetic compass, a sighting device chosen an alidade. You take already learned a i kind of alidade (run into Section 3.1), but this one volition be slightly different. | |

Making your own alidade | ||
| 21. With the plane-tabular array described in a higher place, y'all should use an alidade about twoscore cm long. Get a straight strip of forest twoscore cm long, 5 cm broad and 0.5 to 1 cm thick. Detect the centre-line, then mensurate five cm from each end and draw a line from the edge of the alidade to the centre-line. Cut out the section you take marked off. | | |
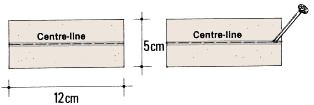
| 22. Get a clean, empty metallic tin and remove its acme and lesser. Cut this tube vertically and flatten it out to make a canvass of metal. 23. From this sheet, cut out 2 pieces 5 cm x 12 cm each. Mark the centre-line lightly on each, using a smash to scratch the line. | | |
| | ||
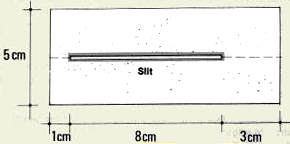
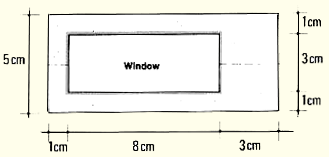
| 24. On one of these pieces, cut an 8 cm slit forth the center line, starting nearly ane cm in from the five cm edge. | 25. On the 2d piece, cut out a 3 cm x viii cm window, as shown in the drawing. | |
| | | |
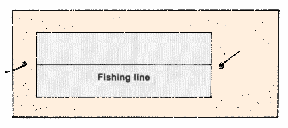
| 26 . On the piece with the window, brand a minor hole at each cease of the window "frame", along the center-line. Thread a thin line (such as wire or nylon line-fishing line) through these two holes and knot the ends at the back. This line should now exactly follow the centre-line of the window. | | |
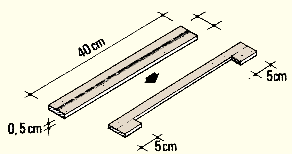
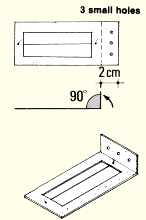
| 27. On each metal piece, use a smash to depict a adequately deep line perpendicular to the eye-line, at a betoken 2 cm from the end without a slit or window. So make three small holes parallel to this line and betwixt the line and the finish of the piece, using a hammer and nail. Sharply curve this end of the metal along the deep line, until it forms a correct angle with the rest of the piece. | | |
28. Adhere the metal pieces to the ends of the wooden strip you prepared in footstep 21. Hold them in place with a small screw in each of the holes you lot have made in the metallic. Make certain that:
You volition use the alidade set flat on the plane-tabular array. You lot volition sight through the slit at the wire. You will describe the line along the eye-line of the wooden strip. | | |
Using the aeroplane-table | ||
29. Yous can employ the plane-table in ii different means, depending on the type of survey you are making:
The aeroplane-tabular array tin also exist used for measuring horizontal angles. 30. Earlier you plan survey with the plane-table, you will demand to:
Yous will learn more than well-nigh each of these procedures later on (see steps 34-47). | | |

| 31. When you are ready to start surveying with your plane-table, you will and then:
| | |
You lot will learn more than nigh each of these procedures afterwards (see Chapter ix). | | |
What are the advantages of plane-tabling? | ||
| 32. Compared with other methods of plan surveying, aeroplane-tabling is better in some means considering:
| | |
What are the disadvantages of plane-tabling? | ||
| 33. Several disadvantages to plane-tabling are that:
| | |
Roofing the lath with cartoon newspaper | ||
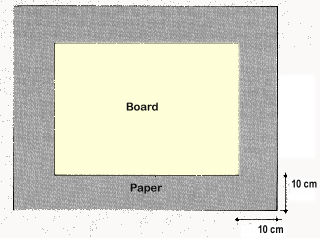
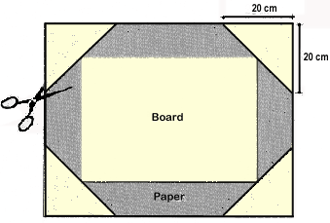
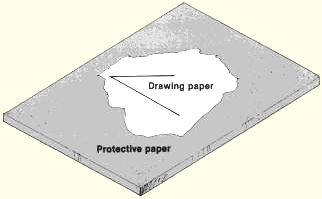
| 34. You should try to detect the best quality drawing paper possible to utilise with the plane-table. Since the paper volition exist exposed to outdoor conditions, you should set it to make information technology more resistant to changes in the humidity of the air. With a wet cloth, lightly dampen the newspaper and dry information technology several times before you employ information technology. This is called seasoning the paper. Note: exist careful not to make the paper also wet when you season information technology. 35. Cut the sheet of drawing paper to a size 20 cm larger than the dimensions of your drawing board. 36. Cut the 4 corners of the newspaper off diagonally. To exercise this, measure twenty cm from each corner forth its two sides, and marker the points. Join these points past diagonal lines, and cutting forth these lines. | | |
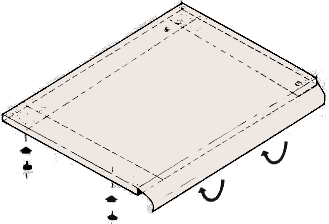
| 37. For the last time, slightly dampen the back of the drawing sheet, and then identify it over the lath. Stretch information technology well (taking intendance not to tear it) and secure the edges under the board with drawing pins. This will go on the paper from moving and preclude the wind from getting underneath information technology. | | |
| 38. If you program to piece of work in the field for several days with the same slice of drawing paper, you should protect it by covering it with a sail of smooth, heavy paper. As you work in the field, yous can tear off pieces of this cover sheet to expose the drawing newspaper as you need it. 39. You lot should keep the plane-table in a waterproof canvas bag when yous carry it in the field. | | |
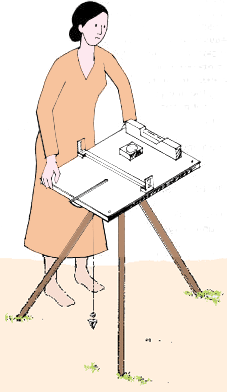
Setting up the aeroplane-table | ||
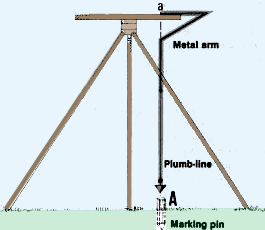
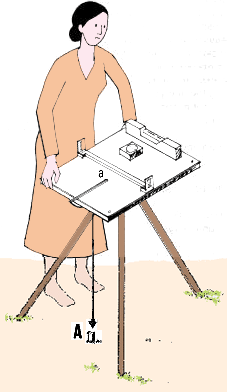
| 40. If you decide to offset the survey from a selected station, first fix the plane-table over this station. Annotation: you may need to set upwardly the plane-tabular array then that a point drawn on information technology is exactly over a corresponding ground point. You tin can use a V-shaped metal arm and a plumb-line, which you tin can easily make yourself. | | |
| Otherwise, y'all can apply calipers and a plumb-line. The metallic arm or calipers should be placed with one tip touching the point on the plane-table and the other tip on the underside of the table. Hang the plumb-line from the point indicated on the underside of the table, and motion the table until the plumb-line is directly over the ground point. 41. Spread the tripod legs well apart, and constitute them firmly in the basis. The drawing board should be waist-high, then that you may curve over information technology without resting against information technology. | | |
| 42. Rotate the tabular array top so that the newspaper is in a position that allows you to draw the whole area y'all demand to survey on it. | | |
| 43. Choose the scale you volition use (come across Section nine.one), making sure it will allow you to plot even the about distant point on the newspaper. You can first walk rapidly over the terrain you volition survey to bank check the distances by pacing so you tin determine on the right scale to utilize (see Section 2.2). | | |
| 44. Level the board with the spirit level, making it as horizontal as possible. To practise this, first place the spirit level along one side of the board, parallel to two legs of the tripod and adjust the table to a horizontal position. Then place the level along the side perpendicular to that pointing toward the third leg of the tripod and adjust once more. Echo this process until the lath is horizontal. | | |
Orienting the plane-table | ||
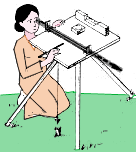
| 45. You lot can orient the airplane-table either by using a magnetic compass or by backsighting. Usually, the board is first oriented roughly past compass, and and so more than precisely by backsighting. | | |
| 46. If you use a magnetic compass (see Section iii.2), rotate the compass until the direction of the needle lines up with the direction of south-north, or the 180� to 360� direction. Draw a line on the drawing newspaper showing this direction. Draw some other line in the same management on another part of the paper. Mark the n direction on these lines with an arrow and the alphabetic character N. Note: remember to keep away from any materials which could accept an result on the magnetic needle of the compass (come across Department 3.two, step 17). | | |
| 47. If at a surveying station you know the direction of a line which you have already plotted on the lath, you tin use that line to orient the airplane-table by taking a backsight. Information technology is the most precise way of orienting the plane- table and you lot should use information technology whenever possible. | | |
| Example From station A, y'all have already plotted line ab. Set up the plane-table at station B. Place the centre-line of the alidade along line ba on the board. Rotate the board until the line of sight on the alidade lines up with line BA on the footing. The table is now oriented. You can proceed to survey and plot new points. | Station B | |
Airplane-tabling methods for reconnaissance surveys
48. During reconnaissance surveys, yous can use aeroplane-tabling to rapidly map out areas and open traverses. The survey will go along past one of the methods described before in this chapter or a combination of them. This method may be:
|
| |
| | | |
You lot will learn more about mapping with a airplane-table by these surveying methods in Affiliate 9. | |
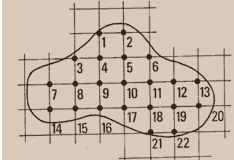
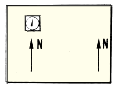
Plane-tabling for plotting details | ||
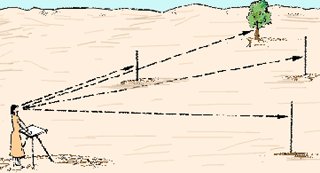
| 49. When yous accept finished the reconnaissance survey and accurately mapped the main stations, you tin can further use airplane-tabling to locate details such as rocks, buildings, a well or a group of trees. | | |
| fifty. To do this, fix the plane-tabular array at each of the chief stations in plow, and draw sighting lines to each of these features. 51. You can locate each detail on the drawing board past finding the intersection indicate of at least 3 sighting lines. You will not accept to take any more measurements. | ABCD main stations | |
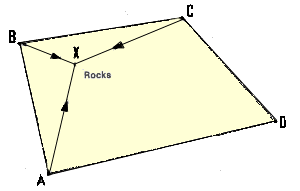
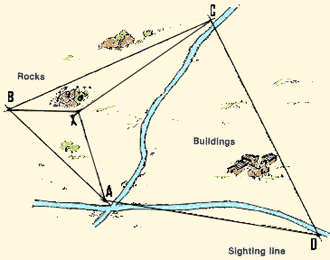
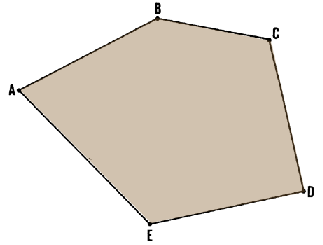
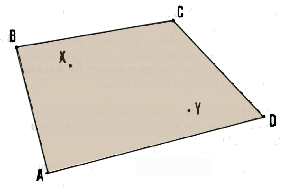
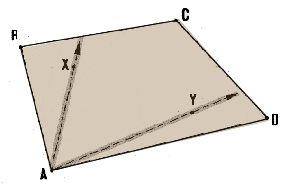
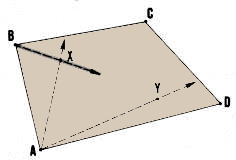
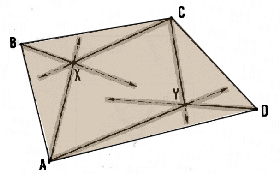
Example
During a reconnaissance survey you have accurately mapped the fish-farm site ABCDA using your plane-table. You want to add the verbal positions of a rock outcrop Ten and a group of buildings Y. Proceed every bit follows:
- fix the aeroplane-tabular array over point A, orienting it by backsighting known lines AB and AD;
- draw lines AX and AY;
- movement the plane-table to bespeak B, orienting by lines BA and BC and describe line BX;
- move to point C and draw lines CX and CY;
- motion to point D and draw line DY;
- determine the position of X at the intersection of AX, BX and CX;
- determine the position of Y at the intersection of CY, DY and AY.
| Site ABCDA | Sight from point A | |
| Sight from bespeak B | Sight from signal C | |
| Sight from point D | The intersections decide points X and Y |


Measuring horizontal angles by plane-tabling | ||
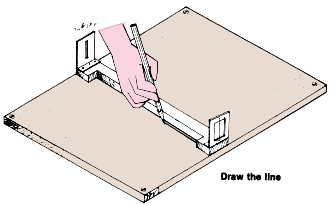
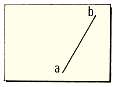
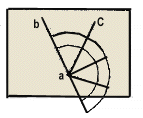
| 52. You can measure horizontal angles fairly accurately past drawing sighting lines on a aeroplane-table and measuring this bending with a protractor (come across Section iii.iii). | Draw ab | |
| Example
| Draw air conditioning | |
| Measure bac | |

![]()
Source: https://www.fao.org/fishery/docs/CDrom/FAO_Training/FAO_Training/General/x6707e/x6707e07.htm
0 Response to "at what angle is the offset arm to the body of the piece?"
Post a Comment